Monday 17 June 2013

Hello World and the Ultimate Sponge Cake Recipe.

I haven't been blogging long and I'm just getting used to certain aspects of it. Lovely emails from strangers who have questions or comments are so nice to receive and I also love looking at my stats. I'm a number lover, statistics was a favourite module at Uni once I'd mastered it and I can't tell you my joy at a well put together pie chart, so I have started to check my blog stats.

As of today, I have had hits on this page from the following countries...
United Kingdom

United States

Palestine

Germany

France

Guadeloupe

Peru

Netherlands

Argentina

Malta
How amazing is that? So Hello World, Bonjour Guadeloupe, Hola Peru, Hello Malta, Marhaba Palestine, Hello everyone and thank you for taking time to read my blog. Its nice to know somebody is listening ;-)

On to the pressing matter of cake.......

This is the definitive, 'never fail', sponge cake recipe as shared by my mother who made my fabulous mountain/ski themed wedding cake. My husband and I met on a ski trip in 2008 when I was working in a hotel in the Alps. He came along with 10 friends and the rest is well documented history.......

Preset your oven to 180 oC, maybe a little less, around 170 oC for a fan oven and grease and line 2 x 9 inch  round cake tins, mum uses metal tins, I use silicon, the war continues.....

The trick is all about weighing your eggs, which is serious news to me, but on further research, my hero Simon Hopkinson also weighs his eggs so who I am I to disagree. Weigh three medium eggs, in their shells and whatever the eggs weigh, match equal amounts of butter, caster sugar and self raising flour.

Cream together the butter and sugar until pale and very fluffy. To the butter/sugar mixture, add your flavourings, the options are endless but try the following..

Half a teaspoon of vanilla essence or bean paste
or
One teaspoon of lemon juice or limoncello
or
One teaspoon of instant coffee dissolved with a few drops of hot water.

Add one of your eggs to the butter/sugar/flavour mixture and one third of your flour. Keep your mixer or whisk on the slow setting to incorporate everything together and repeat with your second egg and another third of flour, then your last egg and the rest of your flour.

If making chocolate sponge, replace 3 tablespoons of flour with 3 tablespoons of cocoa powder.

Blast your mixture on full for a couple of seconds to get some air through the mix but be careful not to cover yourself, just drape a clean tea towel over the bowl to avoid a mess.

Divide your mixture between the two tins and bake for around 20 minutes until firm and light brown. 

Remember the skewer trick if you are uncertain. Pop a skewer, kebab stick, or cocktail stick into the centre of the cake, if it comes out clean it is done. If it is still a little sticky, you might need another five minutes before checking again.

Leave the sponges to cool in the tins for a few minutes, then turn on to a wire rack and leave to cool completely.

If you are cooking a large wedding cake like mine, you can cook the sponge ahead of time and freeze them. Place your cold sponges carefully into large freezer bags and freeze them until you need them. They defrost in a few hours and are much easier to ice and handle when they are very cold.

Fillings are at your discretion depending on your tastes. Lemon curds work well in lemon sponges and really good strawberry jam is essential when making a vanilla sponge. Frosting for the filling is easy, just beat 80g of butter and slowly add 250g of icing sugar until it looks pale and tastes sweet. if you need to loosen the mixture, add a teaspoon of milk as you need it.

The cakes were covered with ready roll fondant icing, rolled out thinly and covered carefully. The bumpy snowscape was achieved by putting cherries under the icing. Dry cherries such as fresh and pitted or glace cherries work well.

All this was finished off with edible snow, available on Amazon or cooking stores such as Lakeland and decorated with easy to find plastic trees, which if you have ever made a Christmas cake or a Yule log you'll have knocking about. The pylons and ski hut were from Hornby train sets which again, are easy to find on line or at your toy shop.

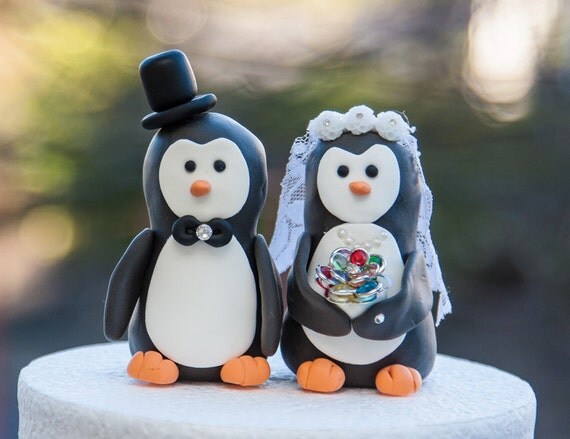
Etsy.com is also a brilliant place to visit to find unique, handmade or vintage items with which to decorate your cake, like these little characters below. 

Penguin Wedding Cake Toppers

Have loads of fun and don't be afraid to make your own wedding cake, scratch that, don't be afraid of making your daughters wedding cake or your friends, sisters, families, with a bit of imagination and practice, you'll create something brilliant, make it personal, hilarious and special and importantly, you will save an absolute fortune.


Sunday 9 June 2013

Sneaky Peeky Wedding Cakey.


This piece of cake genius was my wedding cake, made by my brave and talented mother.

What you can't see are the tiny silver charms of snowboarders and skiers and the little chairlifts on the pylons which were so cute and shiny and original. It was so light and moist, tasted great and looked superb. I plan on wrenching the recipes for all four flavours of cake and where to buy edible snow, from her when she returns from her trip to the Alps. Watch this space.

DIY Cheese Tower and being terribly sorry.....


The terribly sorry bit is an apology for my absence for the last 2 MONTHS! I have been preparing to legally become Mrs Burr and last Saturday this happened. We got married at Windsor Guildhall in bright sunshine to rapturous applause from a thousand tourists and most of the restaurants up on Church Street.

I was so nervous and rather stressed the night before as we had chosen to do a bit of a DIY wedding and so the prep was heinous. After tipis went up, tables were laid and cake was created, everyone left except the puppy and I set to decorating the Cheese Tower which had been delivered the day before.

Most of my greatest triumphs have occurred when I have been totally strung out, early in the morning and the Cheese was no exception.
The cheese was courtesy of The Cheese Shed, who were excellent and their website is a huge amount of fun even if you don't need a cheese tower. The Cheese builder tool provides hours of fantasy cheese shopping.

There are ready selected towers online but we decided created our own and chose a 4 kg wheel of Wensleydale as a nice sturdy base, then a Smoked Wedmore on top, all 2.4 kg of it. The smoked cheese gave the whole tower a wonderful aroma, you could really smell it coming, and the orange rind was a lovely zing of colour against the pale Wensleydale.
As we had lots of pregnant ladies we opted for all pasteurised cheeses and the hard goats cheese we sampled was creamy and so moreish. Woolsery is four month matured and from Dorset, it is now my new favourite cheese and I have it on good authority that it makes superb cheese on toast.

As a nod to our friends from the west country we topped the Woolsery with a Cornish Yarg. Covered in a nettle skin it has a very rustic look and has a satisfying crumble. The key to choosing your cheeses has got to be style as well as taste and the Yarg has both in heaps.

No Cheese Tower worth its biscuits leaves out the blue, and although we originally ordered the Cornish Blue we ended up with Colston Bassett Stilton, which was apt as working in that dairy was one of my first jobs. I was the smelliest 17 year old in the village but boy did I get to eat a lot of cheese.

The two smallest cheeses were Eve and Gevrik which are both soft goats cheeses, however in the picture you can't see the Gevrik as I believe it was nommed before the cheese hit the table. I'm giving a suspicious sideways glance to my mother.

To decorate the cheese I placed the Wensleydale on a big chopping board. Nothing fancy, just the one I use everyday but given a really good scrub and dried well.

On the board I laid some safe flat foliage and herbs. You can use fennel fronds or spicy globes, flowering chives also look lovely but hard to find unless you grow them yourselves. Place the first cheese on the foliage and layer other herbs of your choice on top of the first wheel. I used Rosemary between the Wensleydale and the Wedmore and placed small, hard white buds and Lemon Thyme between the Yarg and the Stilton.

To add some colour and texture to the tower and to provide some garnish, I used Muscat grapes and yellow and red cherry tomatoes. Muscat grapes are a lovely muted purple colour and aren't as bright or uniform as the regular black or green grapes you snack on. Muscat grapes are available at Waitrose along with cherry tomatoes in different colours and shapes. To secure the grapes and tomatoes all you need are lots of cocktail sticks, pointed at an angle into the cheese at regular intervals. Its best to put the grapes onto the cocktail sticks, stalk hole first. Obviously, 'stalk hole' isn't the technical term.

If your little tomatoes have the green pith leaves from the vine still on them then attach them through the bottom to show off some colour contrast.
I really wanted to decorate the cheese with Physalis too, as their soft orange colour and brown papery leaves are perfect for the overall natural look. Unfortunately, I just couldn't find any. Nor could I get hold of any fresh figs which would look charming cut in half and placed on the board.

As with everything, less is more and although there are so many ways of decorating a tower in line with any theme, I garnished delicately and ultimately let the cheese do the talking.

I am so pleased with the overall homespun, countrified look of the tower and it complimented the wedding styling beautifully.

I have so many pictures and ideas for brilliantly decorated cheese towers if any one needs them, but if it all seems to much, message me and if you live in Berkshire, Hampshire or Surrey, I'd be happy to do it for you. Through the fuzz of 1 AM pre-wedding day nerves, it was very rewarding and so much fun.
 P.S. 12-15kg of decorated cheese is very heavy! It took my husband, my brother-in-law and Sophie 'helping' to carry it from the house.


Monday 18 March 2013

Porcini and Pancetta Parppadelle


Mushroom success courtesy of Simon Hopkinson

My most favourite cookbook of all time is Simon Hopkinson's The Good Cook, and I can't lie, this recipe is word for word his (almost).  Its creamy, without cream, very mushroomy and earthy, without lots of mushrooms and quick and easy , even though the rewards are vast.
So this post is for Dani and Moff who seemed to rather like this recipe over last weekend. If your friends are veggie, omit the Pancetta.

Serves 2 very well for a main or 4 people for a starter

500ml of milk
30g of dried Porcini
60g of butter (40g for the roux, 20g for topping)
25g plain flour
200g Parppadelle, you can also use Tagliatelle as Parppadelle is just thick pasta strips but it doesn't have such pleasing alliteration.
70g of cubed pancetta
As much Parmesan as Physics allows

Preheat your oven to 180C

Warm the milk on your hob and add the dried mushrooms. Staying on a low heat, Soak the mushrooms in the milk for 15 mins until the milk has changed colour to a  light brown, earthy colour. Strain the milk into another pan and squeeze the mushrooms in a sieve with the back of the spoon for extra mushroominess. Set the milk and the mushrooms aside.

Melt 40g of butter and add the flour to make the roux. Cook this roux on low for a few minutes to minimise flouriness in the sauce.
Pour in the mushroom milk and whisk well until smooth. Cook over a low heat for 30 minutes or until the sauce has the consistency of double cream,stirring frequently and season.
Pop the mushrooms back into the sauce and take it off the heat.

Boil a pan of water with a dot of salt and cook your Parpadelle until al dente. The dish will be baked and the pasta will cook more in the oven so if you cook the pasta too well it can go mushy.

Once the pasta is ready after around 5 mins, drain. Move this pasta to a roomy bowl and cover with the mushroom sauce. Mix well and if you are using Pancetta, add it now and mix well again.

If this is a main course for two, add the pasta mixture to an oven proof dish or split equally between ramekins for a starter. Dot the extra butter over the top of the pasta.

Cover with as much Parmesan as possible and bake for around 15 mins or until the Parmesan has formed a light brown crust. Serve with salad and bread if its your main course.

Really good with Cloudy Bay Sauvignon Blanc as thoroughly researched on Saturday night.

Monday 4 March 2013

(Re)Discovering Bath Chaps

I have fallen in love again with Bath Chaps.

Although I'm sure the gentleman of Bath are terribly flattered, their town is wonderful and the Christmas market for certain the best in the South, I'm not talking about Spa-going, tweed wearing man folks.

Bath Chaps are an ancient concept, they were hugely popular back in the days of brining Pigs heads and using aspic but have fallen out favour. They are Pigs Cheeks. The rather massive, sometimes hairy, jowly, chops of the beast and they are delicious.

I can see why they may have fallen out of favour. They are fatty, quite reminiscent of Pork Belly but actually with more meat once the fat has rendered down through cooking, and the Chaps I bought the other day did have residual Pig beard on them so some may squirm at this overtly, piggy cut of meat.

I am lucky enough to live near the farm shop at Windsor where the butchery is first class and they will literally sell you any part of the animal because everything from breeding to rearing to butchery happens on site. The Bath Chaps were neatly parcelled up in one of the chillers and looked very tasty and a bargain at £2.45. I couldn't resist.

I am always on the look out for cheap and tasty ways of using meat so I had to have some even though I had no clue how to cook them. I vaguely remembered going to The Taste Of London and having slow cooked pig cheeks with creamy mash and thinking it was the greatest thing I'd ever tasted, so seeing that packet of Chaps I took on the challenge and went home to Google furiously.

One Chap. There is quite a bit of meat to be had on these but it requires slow cooking to melt the flavoursome fat. They might appear big when you start preparing them but they will shrink during cooking.

All sorts of recipes came up to my delight but so many of them seemed to turn this simple, frugal dish into something unnecessarily expensive. I was sure that traditional Bath housewives didn't slow cook their Chaps with saffron and langoustines so I asked myself my important culinary mantra WWEDD?

What Would Elizabeth David Do? No fussy haute cuisine nonsense, so I checked her Pork Belly Recipe and adapted it to my cheeks........

Simple Slow Cooked Bath Chaps

Serves Two

Two Bath Chaps
String
Sea Salt
Cloves

Lay your Chaps, skin side down and gently cut down the fat in the middle of the Cheek to allow it to open out. This helps when rolling the Cheek and stringing.

Turn the Cheek over to see the skin side. If you are lucky, your butcher will score it for you, if not, score the skin down to the fat diagonally, about 1cm between each cut.

Turn the Cheek back over, scored skin side down and roll the cheek as best you can. Secure with the string, one tie at each end and one in the middle. It doesn't have to be perfect but try it a few times to get the best tight roll you can.

Lay the Chaps on a wire tray in a roasting dish so they won't end up swimming in their own fat and sprinkle with sea salt. Try to get the salt between the scoring on the skin as it will help with some good crackling.

Finally, stud the Chaps with 2 or 3 cloves and pop them in the oven.

Give them 15 minutes at the highest heat your oven will go, around 220c for most household ovens, then turn the oven down to 100c and let the Chaps cook slowly for around 3 hours. Turn off the oven but don't open the door, so you can retain the heat.

The fat will render down and the Chaps will shrink but the meat will be deliciously tender and the crackling, superb. Leave the Chaps to rest in the oven in the retained heat for 20-30 minutes before serving.

Cut into thick rounds, about 3 per Chap depending on their size and remember to remove the string.

I served this with creamy, spring onion mash, buttered carrots, parsnips roasted in the Chaps fat and fennel puree as a birthday meal for two. It went down very well with a bottle of Cotes-du-Rhone.


Angelic Dinner Party Ribollita


It is still Winter and so we still need comfort food. I woke up yesterday and found my garden covered by a thick frost even though the day before was glorious and bright. A balmy 10 degrees which is astonishing for February. My friend Clare and I, took a walk around the Mill Pond and it was so nice we did a double lap and were almost tricked into thinking summer was coming.
But just because we still need two duvets on the bed, it doesn't mean we shouldn't start thinking about Spring and shedding our "Winter Coat" as my fiance kindly puts it, especially when we are hiding inside in the evenings and temptations are rife, and on the subject of temptations, we have friends coming over for dinner tonight. Last night we went out for dinner, so to atone for the Sticky Toffee Pudding I gorged upon at 'Silks on the Downs' in Ogbourne St Andrew, I think I'm going to make my Ribollita.

This is a classic, rustic, Italian soup, almost a stew, and therefore we shall call it a Stoup. It is so warming and inviting but basically it is vegetables and beans, no fats, with the exception of some olive oil, and as long as you don't go over board with bread dunking you should feel gloriously satisfied and angelic after eating it.

Use whatever vegetables you have lying around for this recipe, my veg box is heaving with carrots and cabbage so I'll be using those as the basis for my stoup.

This makes enough for four very generous servings but you can hold some back for lunches which is much better for your health and mood than a limp sandwich at your desk.

Your Ribollita Shopping List.

1 tablespoon of Olive Oil and extra for drizzling
1 tablespoon of Sunflower Oil
1 medium Onion or 3 Shallots
2 Cloves of Garlic or 1 teaspoon of Garlic Puree
2 Medium Carrots, washed, peeled and chopped into rounds
1 Fresh Beetroot or any other vegetables you need to use up, washed, peeled and diced
1 bay leaf
1 sprig of Thyme
2 Medium Potatoes, washed, peeled and diced
1 tin of tomatoes
1 medium cabbage, kale or cavolo nero roughly chopped
150g of white beans, canned or re hydrated from dry.
1 litre of water
1 litre of chicken or vegetable stock
Sea Salt
Chunky Slices of bread to serve
Chopped Parsley to garnish


Ribollita Recipe

If you are using dried beans, get these re hydrating the moment you consider doing this recipe. Most instructions will tell you to leave them soaking overnight but if you put them in a bowl and cover them with warm water on your way out the door in the morning, they'll be ready for when you get home from work.

Holland & Barrett sell a dried bean mix which is great for this recipe and I pick out the kidney beans before re hydrating them.

If you are less well prepared, go to your cupboards and pull out any white beans you have canned. Borlotti, Haricot, Pinto or Flagolet work well and give a nice brightness to the dish.

So, start by heating the olive oil and sunflower oil in your largest,heaviest, pan and throw in the onions or shallots. Sweat them on a low heat until they start to become clear not brown. Peel and chop the garlic cloves or add a teaspoon of garlic puree.

After a few minutes, add the peeled, washed and chopped carrots to the pot along with your beetroot. If you are using celery, now would be the time to pop it in as well. At this point, if you are free styling with your vegetable choices, go for any roots such as Jerusalem artichokes, turnips or swede.

Let these vegetables soften down on a low heat for five minutes and keep them moving. If they start to brown in really effects the colour of the finished soup.

When the vegetables have softened a bit, throw in the herbs along with the peeled and diced potatoes and leave to soften again for a few minutes. Now its time to add your tin of tomatoes and leave to cook for ten minutes, again, keep it moving so it doesn't catch the bottom of the pan.

Now, add whatever roughly chopped greens you are using and your beans, along with 1 litre of water and 1 litre of chicken stock. You can use vegetable stock to make this dish vegetarian. Season to taste with some sea salt and bring to the boil.

This isn't a dish that needs watching constantly, once it has reached a boil, immediately lower the heat, cover and leave to simmer for two hours. Visit it every half and hour or so to stir and have a good whiff of the thyme and garlic but mainly go and get on with something else.

My living room is a tip, so I'll clean that up and do some knitting with a cup of tea whilst it is simmering away.

Once the beans are soft and the veggies are cooked, check the seasoning and add more salt and a bit of pepper if you fancy it and switch on your oven to around 180C. You'll need a good Cast Iron or Pyrex pot for this bit. I use my Le Creuset dish which I just couldn't live without. In the bottom of said oven-proof dish, layer some chunky bits of bread like baguette or pain de campagne and then ladle your finish Ribollita over the bread. At this point, pull the bay leaf or bits of thyme twig out if you see them.

Once all the soup is in the oven proof dish over the bread, it needs around 15 minutes in the oven to warm through and to help the bread absorb the soupiness.

Chop up some fresh parsley and stir through your soup before serving straight away with lots of bread and butter and maybe a sprinkle of Parmesan or Pecorino if you are feeling saucy.